Painting Your Stairs
Before I get to the stair painting, let me briefly recap my home buying experience: when we walked into the house, I knew right away that it could be home. After looking at over a dozen other houses, this was the only one that made me feel that way. I could see beyond the orange kitchen counter tops and brown melamine cabinets. I knew there was hope for the glaringly bright green and black tiled bathroom. And I could even forgive the pink walls and pink carpet. Yes, pink carpet. Because hiding underneath that pink carpet was oak. I will never understand the choice to cover beautiful oak wood with carpet, never mind one that resembles Pepto-Bismol.
(Please forgive the photo as it's a scanned version of the listing photo I kept from 9 years ago).
 |
| Do you see the pink? Can't miss it, huh? |
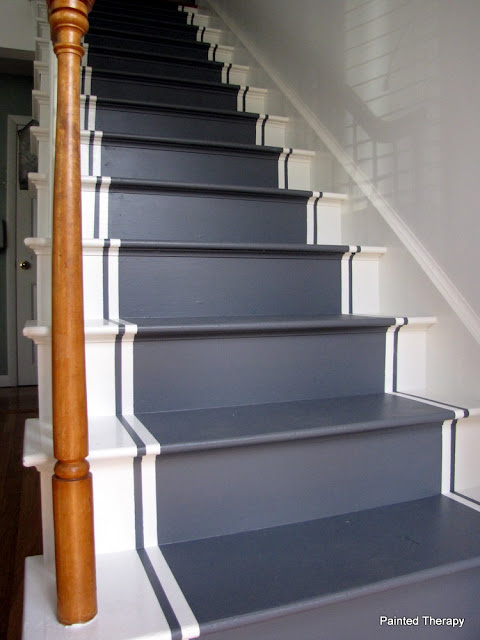
But times do change. And so did my decorating style. Deciding I could not find an affordable runner carpet that I liked, I went for the full-on painted stairs. And although there was a few glitches along the way, it was a pretty easy to do. Just have a bunch of patience in reserve because you will probably need it.
I knew I didn't just want to paint a solid color, nor did I just want to have a "runner" painted alone down the middle. Of course I had to get fancy and add the strips on the side. Your job will be infinitely easier if you decide to NOT take this step as I did. Although, in the end, I am glad I did.
Tools needed: paint and primer, tape measure, pencil, lots of painter's tape, an angle, and a DVD movie case. DVD movie case? Well, I used the movie case because the width of the spine is about how wide I wanted my outside grey stripe. Seriously, why do the extra measuring if you can find something around the house that does the work for you?
For a little bit more info. on the paint, I decided to go with a low-lustre enamel paint. I chose the Porch and Patio Floor paint from Behr and had it color-matched to go with my furniture. After first priming then painting the outside of the stairs my base color (which happens to be the trim in the house), I went to work on taping. I used a tape measure and decided how wide I wanted my center "runner" to be, used the angle to get a straight line then used painters tape to create a line on each step. It definitely gets tricky going over the lip and trim pieces, so you want to make sure you seal the edges well.
After getting the first piece of tape on, I marked the width of my trusty DVD case (we were watching The Lion King, so what the heck?!?), made a straight line with the angle and applied this next line of tape parallel to the first, making sure, again, to seal the edges well. Then do it all over again on the other side of each step.
Here's a photo of the tape lining both sides of the stairs. I think she's ready for the grey.
 |
| I had a little help with the priming. |
Since you are working with stairs, and chances are you need to use them at some point before you are finished, you will need to think of how to paint them so it doesn't affect traffic. I first painted the outside lines and the risers (fronts) of the stairs since no one really steps there anyhow.
Even though I thought I was being painstaking about making sure the tape was on good, I still had problems. My husband says to try the "green" tape next time, as he thinks it would have done a better job. Well, guess what buckoo, there will not be a next time. ha ha
Houston, we do have a problem.
Oh, for the love of Pete, does it look like I even applied tape?
But, you see, this was just a small set-back in the life of a DIYer. And it was nothing that an artist's flat brush and a dixie cup of paint couldn't fix. And hours out of my life. Over days. And days. But I have a sweet reader who reminded me of a very special tip (that I forgot until AFTER the stairs were painted): paint over your tape edges with your base color. If you do so, you will seal the tape with the base color, and the next color (in my case grey) can not get under that pesky tape. BRILLIANT!
Once I had those lines as clean as can be, I then painted the tread of the stairs. You may want to paint every other step, giving yourself a dry place to climb the steps. I chose not to do that since there was enough dry room on the sides to step up and down. Let it be noted that I did add paint additive that gives the stairs a little rough texture and creates traction. I didn't want my little girl to wake up one January morning, socks on feet, and slipping down the stairs to me. Additive can easily be found in the paint section of your paint store.
And there she is. I've decided I like the stairs. They are much easier to clean too, as I just sweep down and vacuum up. I chose not to put poly on the stairs, but I have no problem with them looking "worn" over time. Oh, by then my decorating style will have changed again anyway. :)
Debbie
Sharing with:


Comments
Post a Comment